Powered by Blogger.

Followers

Showing posts with label laundry/mud rooms. Show all posts

My Mudroom Walls Painted (finally)

Monday, January 17, 2011


THIS POST IS FROM ROOM REMIX - THE BLOG .

I can't believe I finally got my mudroom painted after wanting to do it for a year. You probably can't either!!!

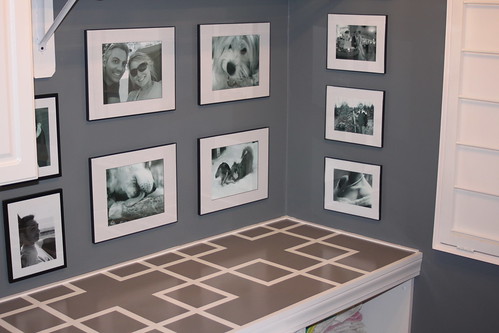
I'll admit, one of the reasons I kept putting it off was that I knew it was going to require a LOT of taping and cutting in and then basically 10 minutes of rolling. That's exactly what happened.  It took more time than I would've liked and two coats, but it was so worth it! I absolutely L.O.V.E. the new color.  I used Benjamin Moore Ashley Gray in a Sherwin Williams paint.(notice the bench? Still loving that, too.)


The pillow has absolutely nothing to do with the room, but the poor place was looking so bare I had to at least get some fabric in there somewhere for the photo (plus I was trying to distract your eye away from the lovely upright freezer to the left)!

I have some other things planned for this space and I'll be sure and share when I get the place cozied up a bit.  I'm pretty sure that won't be another year! :-)

On the topic of paint colors: Stay tuned for a post coming up this month where some talented designers share their tips for choosing paint and their favorite paint colors!


I'm linking this up to Tatertots and Jello and Nesting Place's parties! Be sure to check them out for more inspiration...

Creative DIY Projects

Friday, March 19, 2010


THIS POST IS FROM ROOM REMIX - THE BLOG .

Much To Do With Nothing made slipcovers for her chairs. The best part is, they're reversible, so she can get four different looks! To see the other looks, click here.


Laughing At The Days To Come turned a dresser into an awesome kitchen island...


Designer Tobi Fairley did this chair makeover as part of her design for the March of Dimes Energy House in Hot Springs. Love it! To see more peeks into this home, click here.


BEFORE

AFTER


Averill from Odi Et Amo tranformed this seen-better-days credenza into a fabulous statement piece


This graphic countertop, which I love, is just one of the things that Jenny from Anything Pretty did in her laundry room makeover.


Crafty Sisters transforms a former gun cabinet into a pretty display piece...

and turns this little table into a fabulous tufted stool!

Kitchen cabinets lined with WRAPPING PAPER from It's the Little Things

Hello Gorgeous made her own stencil and painted this AMAZING trellis patterned wall.

Just Something I Made made bowls from a globe she found at the Thrift Store (found via Mod Podge Rocks)

Poppies at Play had a cute idea to customize photos depending on the occasion/person the gift is for...

and she also made this numbered headboard!

Speaking of numbers... How much FUN are these numbered stairs by Lois Keenan (found via Design Sponge)

Have a great weekend!

My Mudroom Bench in BHG publication

Sunday, February 21, 2010


Imagine my surprise and excitement when I saw a comment this morning that was left on my DIY Mudroom/Laundry Room Bench post by Holly at Homebody . She said that she had just been at the bookstore looking at magazines and was almost positive that she had seen my bench in a Better Homes and Gardens special interest publication (wasn't sure which one) and wanted to let me know (Thank you, Holly!).

Thinking there must be a newer issue of BHG Do It Yourself magazine than the latest one I had received in the mail, I headed off to Barnes and Noble to check it out. After realizing that their latest DIY magazine was the same as mine, I decided to look in BHG's Spring 2010 issue of 100 Decorating Ideas under $100 and there it was! As you can see, they didn't say it was my bench, but it IS my bench. :-)

I was also excited to see the numbered flower pot project right above it, because it's my blogging buddy Roeshel's.

(EDIT: There were some questions as to how they found my bench and why I wasn't given credit. As to how they found it: Some of you were wondering if they blog hop and I can't answer that. In my case, I had uploaded my bench photo to their site a while ago and had forgotten about it until now. I'm sure that's how they found it, and I'm flattered that they thought it was a project worth noticing. As to why they didn't mention my name like they did for Roeshel's, I'm assuming it must be because I go by PK rather than my full name? That's the only reason I can think of.)

DIY Mudroom/Laundry Room Bench

Monday, November 9, 2009


My original vision for this makeover didn't pan out. I had envisioned doing a bench with the chairs facing each other, but we tried several templates for the seat and neither of us (hubby or I) were happy with how we thought it would look. In retrospect, I wish we would have tried a little harder to make it work because it would have been more unique.

I bought the chairs at Pottery Barn about 8 years ago (I had already started sanding the red one by the time I remembered to take a photo, so it looks trashed but it wasn't:-)). Unfortunately, when we moved into this house, I really didn't have a place to use them, so they've been more in the way than anything. Initially, it seemed almost a shame to use them because they were perfectly good chairs, but I decided I wouldn't get anything for them if I sold them and why buy a bench when I already had these?
(edited to add tutorial portion):
We used the original seats (set apart a tish so the seat would comfortably accomodate two people) as a template

to trace a bench seat on a piece of MDF.

Cut it out using a jigsaw.

Sanded the mdf seat to prepare it for paint and round the corners a bit. Then screwed it on using the original holes that were there for the chair screws. (I had already primed the chairs at this point)

Primed the seat and then painted the entire bench. We used a little paint sprayer that my husband already had and I think the finish turned out a lot better because of it.

We saved the original seats, and didn't modify the chairs in any way, so if at some point I want to use them as chairs again we just remove the bench seat, replace the chair seats, repaint and Ta-Da - chairs again!

I still need to make a bench cushion or something for it, but thought I should get it posted before everyone quit believing I actually had a bench in the works! :-) To be honest, once I realized I couldn't do it the way I had wanted, I lost my motivation and just let it sit for a while. Then it got cold here sooner than I anticipated so I had to keep my fingers crossed for some warm days to spray the paint on. Thankfully, they finally came!

I'll be adding links to this post for the various blog parties as they happen and the links become available.

Tutorial Link-up - The Lettered Cottage
Metamorphasis Monday - Between Naps on the Porch
It's So Very Creative - It's So Very Cheri
DIY Day - A Soft Place To Land
Trash to Treasure - Reinvented
Get Your Craft on Tuesday - Today's Creative Blog
The Boardwalk Bragfest - Bobbypins Boardwalk
Transformation Thursday - The Shabby Chic Cottage
Surprise Party - The DIY Showoff
Furniture Feature Friday - Mustard Seeds Creative Blog
Creative Cats Friday - Poppies at Play
Saturday Nite Special - Funky Junk Interiors
Frugal Friday - The Shabby Nest

Mudroom/Laundry Bench Remix Progress

Monday, August 31, 2009


Yep. I'm working on it. I know. It must be really difficult to keep up with the speedy progress I'm making! I started on this project on June 28th and I'm ALREADY priming the pieces today! :-)

Could that be the reason for the slightly raised eyebrow and smirk from my husband when he said, "what are you doing?" and I responded "working on my mudroom bench"? I don't have any excuse for not working on it really except that summer was busy and I hate sanding.

I actually enjoy painting, which is the next step, so that should go well. After that I need to get my hubby involved with some power tools so it will depend on his schedule.

I think it's going to actually end up to be a pretty cool bench so I can't wait to share it with you. When do you think that will be? :-)

Hope you're having a great day!

And The Winner Is...

Friday, August 21, 2009


The winner of the Inglenook Decor giveaway is Kelly from Design Ties! Kelly - please e-mail me your choice as well as your address and Maureen will get it out to you!


If you have a space in your home for it, this family bulletin board idea from Womans Day, with a separate section for each family member, is a fun one. If you have a larger family you could always divide it up differently and, if your space isn't this large, you could make a smaller scale version. For complete instructions on how to make it, CLICK HERE.

Have a great weekend!

Sunday Inspiration

Saturday, August 8, 2009


Now THIS is making an entrance!
Source: California Home+Design Photo: John Casado Designer: April Sheldon

DIY INSPIRATION:

1. Laundry room transformation at BeachBrights. You'll definitely want to check this makeover out. You won't believe it!

2. Unique and creative pendant lights at Forever Cottage. Love these!

3. Amazing kitchen transformation at Something To Do. Seriously. Amazing.

4. she also transformed her half bath/laundry room!

BLOG AWARD: Speaking of inspiring, I was surprised and very honored to find out that I received a "You Are A Great Read" award on Saturday from Struggling To Be Stylish!

Have a great day!


Most Reading