Powered by Blogger.

Followers

Showing posts with label before and after. Show all posts

A Makeover, Thank You and the Party Continues!

Sunday, January 30, 2011


THIS POST IS FROM ROOM REMIX - THE BLOG .

Hey there! Hope you all are having a good weekend so far...


Have you seen this makeover by designer Tyler Colgan that is currently featured on Southern Living?

It's a light and airy home with a cozy vibe that feels like you could just walk in the door, kick your shoes off and be comfy.

What makes it even more impressive is that they show what it looked like before, and you won't even remotely recognize it as the same house!

For example the breakfast nook went from this...
BEFORE

to this. An awesome transformation!
AFTER

(To see the rest of the images as well as sources (some very affordable ones like Ikea, World Market, etc.) click here.)
--------------------------------------------

THANK YOU

Thank you once again to Janell, Lauren, Maria, Sherry, Erika, and Emily for participating in the Paint Series! I really appreciated them taking the time to share their tips and favorites with us and I know you all did too!
--------------------------------------------

And thank you so much to these very kind bloggers who've awarded me the Stylish Blogger Award!
Pamela - Be Colorful

--------------------------------------------

The Paint Linky Party will be open for you to add your links until midnight tonight. Thank you to all of you who have already linked up! If you want to link up, or just check out all of the great projects, you can click on the button below to get to the party...

Family Room Makeover

Monday, January 10, 2011


THIS POST IS FROM ROOM REMIX - THE BLOG .


Have you seen this family room makeover from Canadian House and Home?


BEFORE


They turned a blank-slate addition into a cozy family room with a nice, casual eclectic mix that would be easy to imitate.


BEFORE


The striped window treatment fabric was used horizontally rather than vertically for a different twist. I think it looks great but if stripes aren't your thing a solid color pulled from any one of the throw pillows could be used as well.


They also reused some pieces that the homeowner already had, like the chair which they slipcovered in a fabric from JoAnns called Pegasus.

For all the details/sources, you can check out Cameron's post or watch the video: Fashion-Inspired Decorating


___________________________________________


Speaking of makeovers, remember when I made my DIY Mudroom/Laundry Room Bench and I had plans to make a cushion for it, paint the room, make a valance - all which never really got done. Sigh.  I know.  I should be embarrassed since it's been over a year, but I'm really not. :-) But... I FINALLY got the walls painted and I'm SO happy about it. I haven't taken any pictures yet because by the time I got done it was dark outside and I just haven't had a chance in the daylight yet. Promise to share when they're taken. I'll give you a hint though.  Gray...

HAPPY MONDAY!

A Pretty Bedroom Makeover

Tuesday, November 16, 2010


THIS POST IS FROM ROOM REMIX - THE BLOG .

BEFORE

I recently visited Kristen from My Small Treasure's blog, and discovered the prettiest bedroom makeover! I knew you would want to see it too and she gave me permission to share it. She mentioned in her post that she intends to paint her furniture or buy new in the future, but I think these images prove that if for some reason you can't do that you can still have a beautiful room!


She painted the artwork on this nightstand herself and it does a great job of hiding the telephone/answering machine behind it. Clever idea!


Thanks so much, Kristen, for sharing your makeover with us! Didn't she do a great job?

Makeover on a Small Budget - Home Office to Girls Bedroom

Monday, November 1, 2010


THIS POST IS FROM ROOM REMIX - THE BLOG .

If you've been following this blog from the beginning, you may remember (or not) that a long time ago I talked about a request that I received for some decorating advice from a mom (Penny) whose 9 (now 10!)-year-old daughter (Lindsey), was moving from a shared room with her sister into her own room.

The only space available was this small basement office. In addition to making it look like a girls room instead of an office, they needed to incorporate an already existing queen-size bed, a desk, extra storage, and a reading chair. They also wanted to do it all on a small budget.

After I gave her my suggestions, Penny worked on the room as she had time and it's actually been done for a while, but we just hadn't been able to connect to get photos.

Funny thing. The reason for waiting until I could take photos instead of her snapping a few and e-mailing them to me was that I had the better camera. Ha! As you can see in this post, better camera does not equate to perfect images. The day we had scheduled was cloudy/rainy and it definitely shows in the photos (as well as my inexperience behind the camera). I did learn some things like: 1) don't take interior photos on a cloudy day 2) don't decide to use the manual settings on your camera to compensate for the dark room, if you really have no clue what you're doing; 3) Adding an extra (glaring) lamp behind you to make it lighter only results in major shadows: 4) Cranking up the ISO really does result in lower quality, grainy photos! On the bright side? lessons learned. I just wish I had been able to capture Lindsey's room in it's best light (literally!).

_______________________________________________

Anywho. Lindsey had already chosen the Roxy bedding shown in the partial mood board below and wanted to use it as the starting point for the room. (They purchased it at Bed, Bath and Beyond, but it looks like it may no longer be available there.)


The first item on the agenda was to paint the walls. I recommended Sherwin Williams 6710 Melange Green, which is a slightly darker version of the green that is in the bedding.


Headboard- Since the only position for the bed was up against the window and the headboard was too high, she modified the existing pine footboard, painted it white and use it as the headboard. Works much better!

Brown Dish Chair - They had purchased this at Walmart and it was an absolute must on Lindsey's list for the room. With the space being so small we had to get creative with furniture placement, so it went in place of a night stand on the left side of the bed. Functionally, it actually works pretty well considering there is a light overhead for reading and it's in perfect position to prop her feet up on the bed if she wants.
Accent Pillows - To mix things up a bit I suggested foregoing the "bed-in-the-bag" pillows and using other accent pillows. They are from Walmart(circle) and Target(bird).
White Night Stand - Stanley night stand she found on Craig's List for $35!
Pendant Lights - from IKEA. Love them!
Curtains/valance - from Bed Bath and Beyond

I saw this bird art at Target and the colors were perfect for the room, so I picked it up. I knew that it was too small for the wall, but thought it could be incorporated into a larger grouping. The cute grouping below is what Penny came up with. She found the frames on clearance at Target and just painted them blue. Not sure where she got the polka dot ribbon.
When I arrived to take pictures, the desk area looked like it still needed a little something so we quickly whipped up this DIY art. We took peel and stick mirrors that Penny had, added them to these inexpensive plates from Target and hung them on the wall! Because we wanted pink to be the least dominant color, we used a larger mirror on that plate. For some reason the shadows in this image make them look a little wonky, but they're not IRL. For the finishing pop of color and interest we glued green ric-rac to ribbon left over from her other art project and attached it to the desk with double-sided tape. Kylie Desk and chair - from Walmart.


This mirror is from HomeGoods. It was bronze in color, so she taped off all of the circles (yikes!) and spray painted it white. The colorful little storage box is actually a gift box that Lindsey received a gift in. Penny thought it went well in the room, so she used it. Love that! And, of course, Lindsey's favorite soccer bear had to be included in the accessories. The polka dot photo album is from Target. (for the observant who notice the brown clock in the mirror, yes, I swapped it out with the white clock after taking this photo)

Penny mentioned that she's feeling like she may still add something to the space under the pendant lights but, other than that, the room is done and I think she really did a great job, especially on a small budget! Giving the advice was the easy part. Icing on the cake? Lindsey's loving it.

Linking to:

The DIY Show Off

Adding Custom Detail

Sunday, October 17, 2010


THIS POST IS FROM ROOM REMIX - THE BLOG .

Remember last weekend when I did this post on Angled Staircase Wall Inspiration? Shortly after that, Judy from Judith B Designs e-mailed photos to me of her staircase makeover. I knew you would want to see them too, so I asked if I could share them.

With the help of her husband, she took her angled staircase wall from this...


to this...


to this! She says, "We really like the detail it adds to the room and the addition of more white brightens the space as well." I agree 100%. Didn't they do a great job? It's beautiful. Thanks so much for sharing it with us, Judy!


___________________________________________________

Now just in case you don't have a beautiful staircase with an angled wall in your home just begging for detail , here's something that pretty much everyone has. Doors. Lisa from Paint in My Hair (via Tatertots and Jello) transformed her doors with paint and $13 worth of molding and you can too! (tutorial here)...

BEFORE


AFTER


Happy Sunday!

Fireplace Makeovers

Monday, August 9, 2010


THIS POST IS FROM ROOM REMIX - THE BLOG .

BEFORE

AFTER -
a taller slate surround adds warmth, texture and gives the fireplace more presence. The crisp white mantel finishes it off.


Most of us probably aren't thinking about fireplaces right now, but the season for using them will be here before we know it! I thought these fireplace makeovers from BHG.com might provide some inspiration for those of you considering a fireplace makeover. I love the way they provide us with the before photos as well because I think seeing them helps us to better imagine the possibilities for our own spaces.

BEFORE


AFTER -
What a difference! Surrounding dark painted fireplace bricks with beautifully detailed, painted moldings makes this fireplace a fabulous focal point.


BEFORE


AFTER -
Proof that sometimes a good coat of paint and fresh accessories are all you really need.


BEFORE


AFTER -
Paint plays a big part in this makeover as well, but adding the wood surround with the built-in bookshelves balances out what was previously a slightly off-balance, unattractive fireplace.


BEFORE

AFTER -
Professionally cleaning and etching the stones to lighten the color gives this fireplace a completely new look. Adding a rustic wood mantel brings the focus down to room level.


BEFORE


AFTER -
I love this makeover! From drab and dated to detailed and delightful! The built-in bookcases, arched soffit, built-in sconces and decorative moldings all combine to make this a beautiful focal point.

(This has nothing to do with the fireplace itself, but notice how they've used fabric runners on the chairs? An inexpensive way to add color and interest. Also easy to swap out as the seasons change, or whenever you feel like you want a different look.)

To see the rest of the fireplace makeovers, visit BHG.com's slideshow - Before and After: Fireplaces

Sunny Sunday Inspiration - 3

Sunday, March 28, 2010


THIS POST IS FROM ROOM REMIX - THE BLOG .

Coastal Living Photographer Grey Crawford

I've probably mentioned more than a few times that I'm loving turquoise right now, so today I thought I would share some turquoise inspiration combined with yellow for my Sunny Sunday post.

I love the design of the bedroom in the first photo by designer Jill Johnson, and how she paired the turquoise and yellow with gray!

And Anthropologie uses the same color combo in this lamp shade...


Why not add a little red or orange to the scheme to liven it up like they did in this bedding?
Echo Design™ Jaipur Duvet Cover/Bed Bath & Beyond

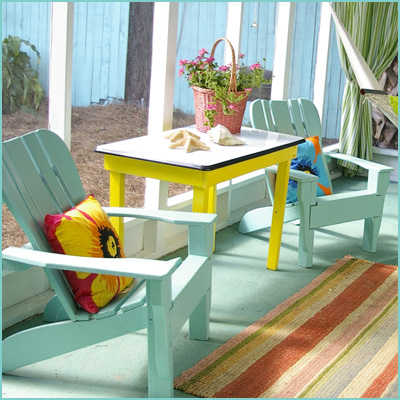
Or this cute sunporch designed by Jane Coslick?

And this bedroom transformation from Southern Living. (Photos Robbie Caponetto)

BEFORE


AFTER


I know I already used this photo in my Decorating with Maps post, but it's part of this bedroom transformation so I had to use it again, didn't I? It's my favorite image from the room. :-)

Hope you're having a sunny Sunday!
 

Most Reading